
Memri comes with the CVU (pronounced as: c view) language that enables you to control how you view and use your information. CVU (c-view) stands for Cascading Views. It’s a language that is easy to understand and allows you to control your view (or perspective) on your information. Think of it as a language that forms the window through which you can see your information. With the CVU language you can describe how you want to view data such as notes, emails, messages and photos.
Memri comes with a default set of CVU definitions that you can use on the most common data types (e.g. note, person, address, photo). Each user can also write their own views. We hope that there will eventually be many views created by an open community of user enthusiasts and professional view makers. We invite everyone to contribute to the Memri gitlab.
Getting started
In order to get Memri running on your system follow this tutorial.
Why another language?
We want CVU to be accessible and easy to use for non-programmers. We started using the JSON format, but quickly noticed that the many syntax errors made that a non-intuitive choice. However, the most important reason for designing CVU is to give the user control over their own user interface. So we needed an easy-to-write script that could quickly load at runtime into Memri. We made the views cascade in order to allow the user to easily modify their views.
Displaying your data in a renderer
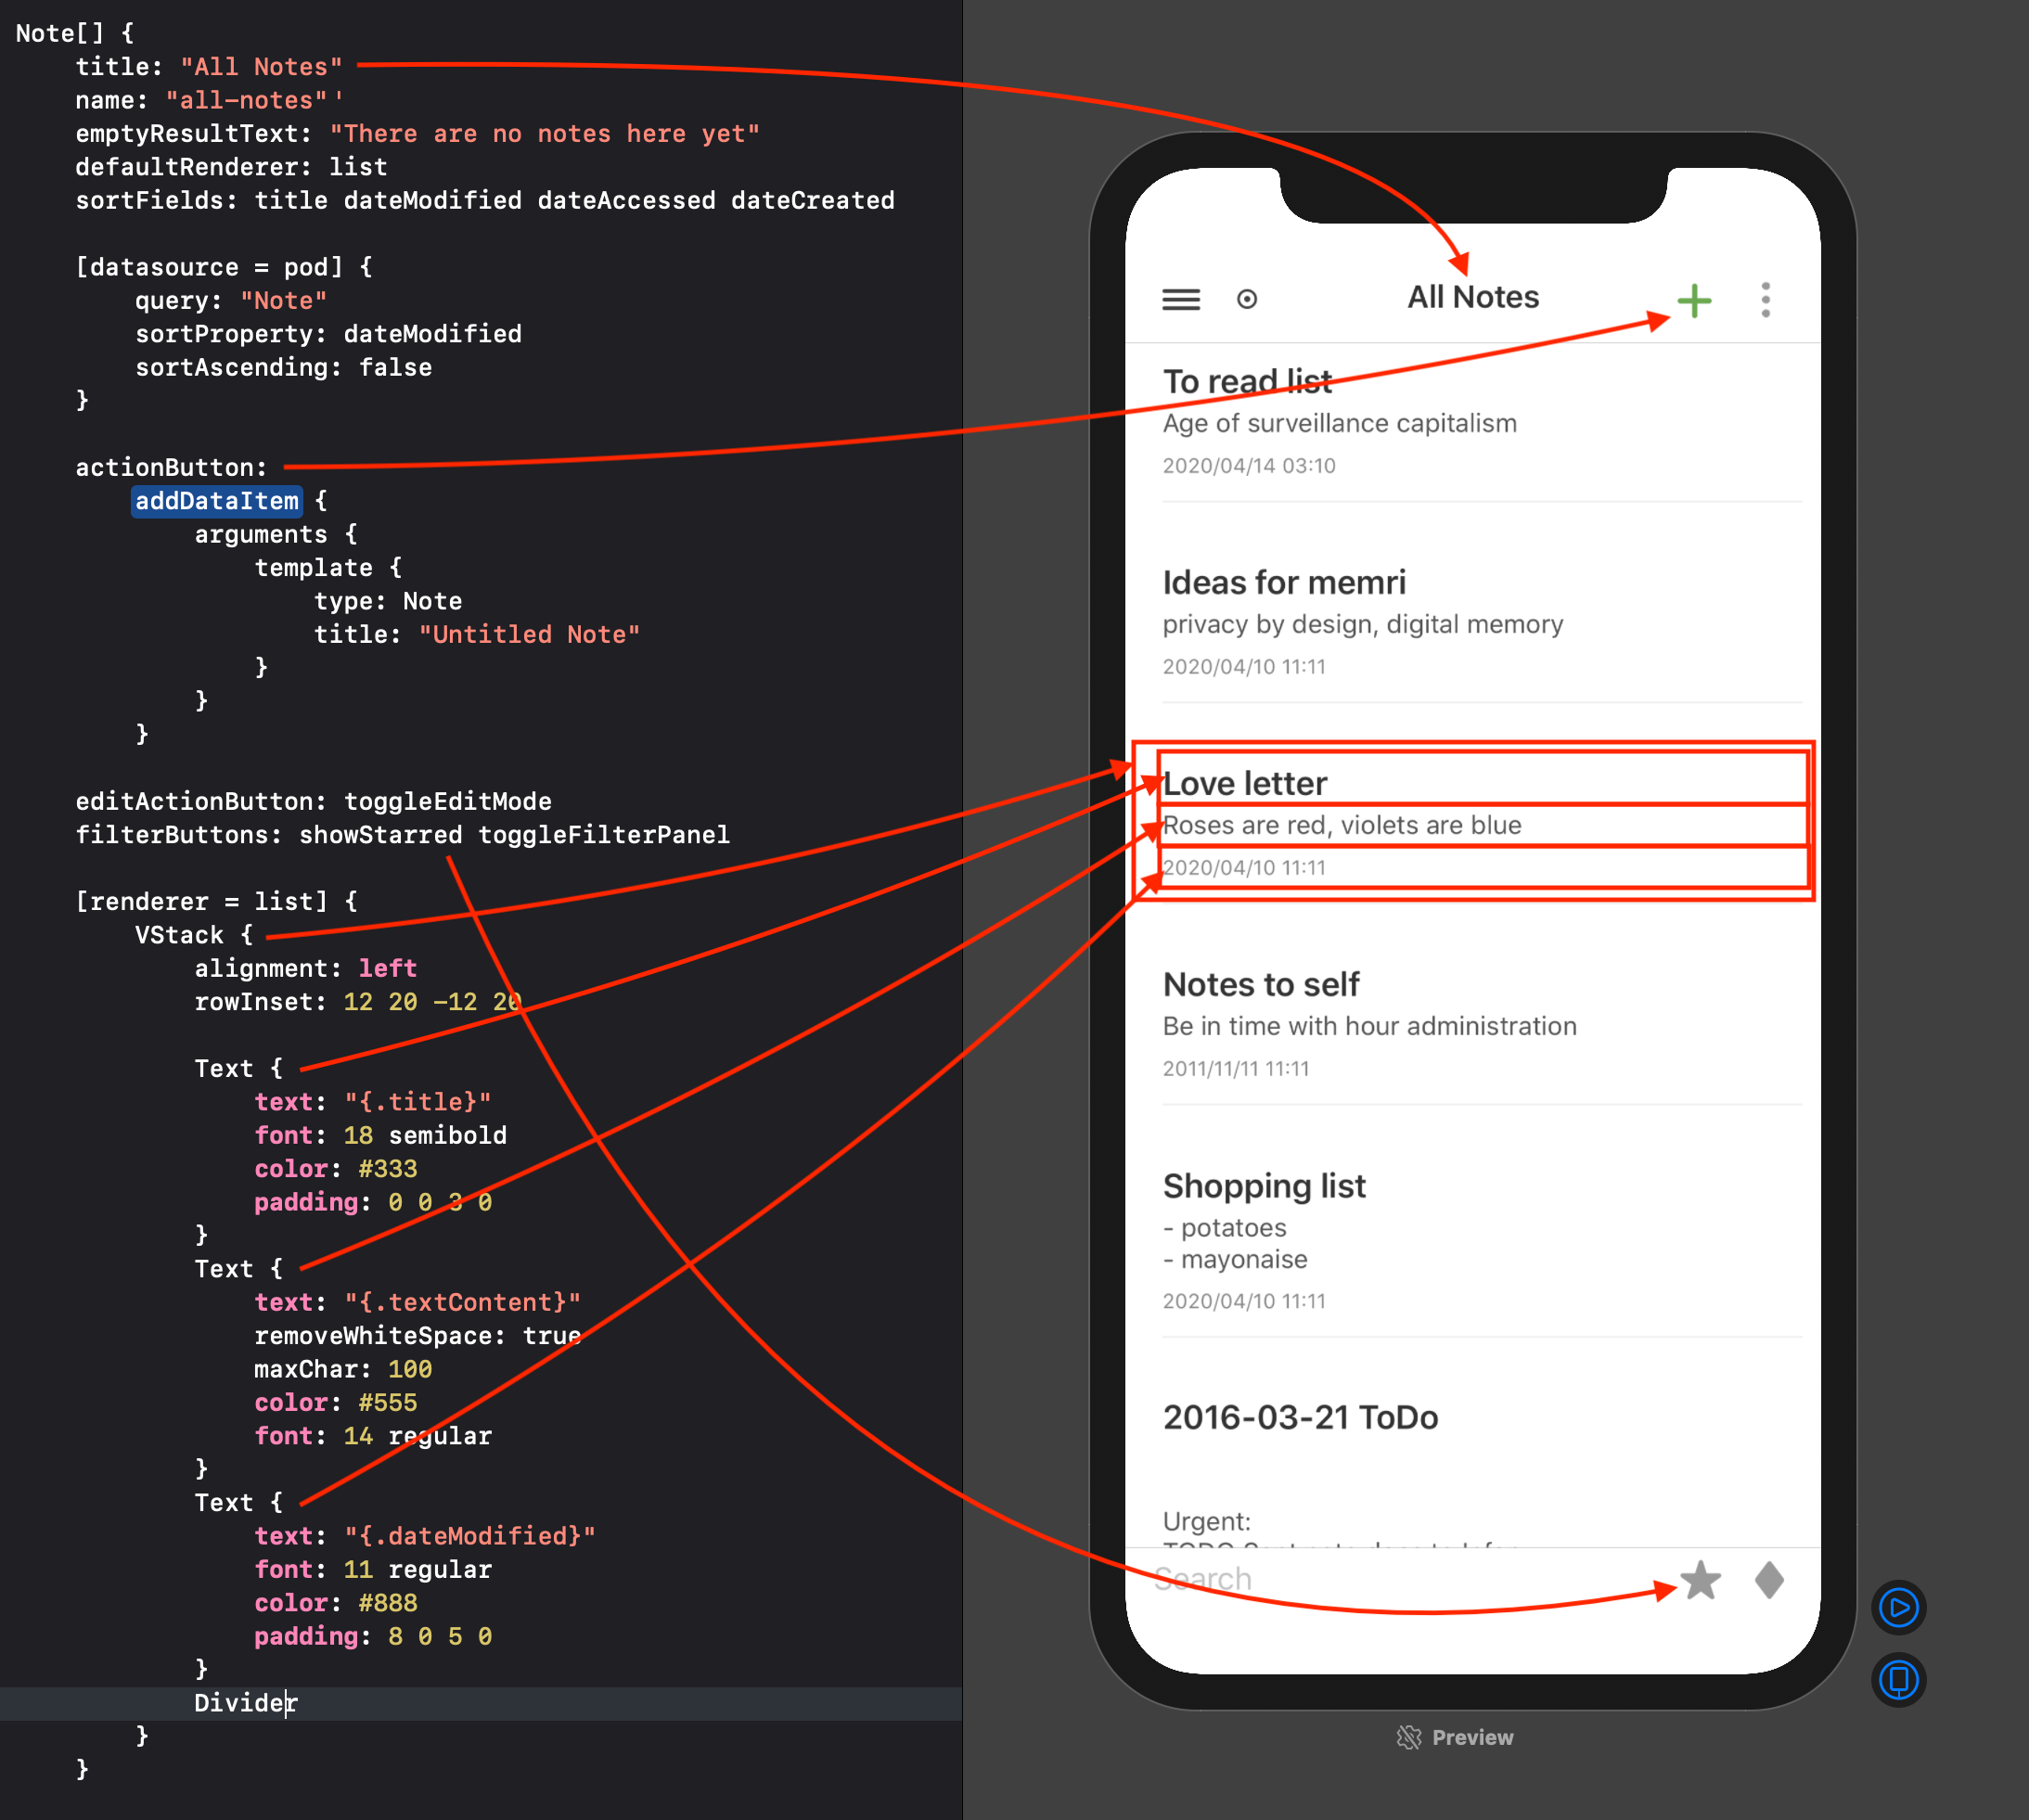
The screenshot below shows the Memri browser displaying a set of example notes. The Memri browser has a navigation bar at the top with several buttons. In the bottom there is a search bar with another set of buttons. All these buttons can be set in a CVU definition. This gives maximum control over the way you view your information.

Between the navigation in the top and the search in the bottom there is a list that renders one row for each note. We call the logic responsible for displaying this the renderer. This specific renderer is the list renderer and as you can deduce, it displays information in a list.
Define your view
Let's dive in and create a view to render the notes in the list view.
In order to define how notes are rendered, let's create a new cvu file called "note.cvu" and add a selector for a list of notes. For illustration purpose we also add the selector for a single note:
/* A view for a single note */
Note {

}

/* A view for multiples notes */
Note[] {

}
Like in CSS, selectors select the content to which the instructions are applied. In the case of CSS these instructions are styling applied to HTML elements. In the case of CVU these are rendering instructions applied to data items. See this wiki article for a complete list of supported definitions.
Configuring the UI
Let's start by configuring the user interface around the main rendering area; the top navigation and search area.
Note[] {
	/* Set the title of the view, displayed in the top navigation */
    title: "All Notes"
	/* This text is displayed when there are no notes */
    emptyResultText: "There are no notes here yet"

	/* The action button on the right of the title (+ in the screenshot) */
    actionButton: addDataItem
   	/* The set of buttons displayed in the search area */
    filterButtons: showStarred toggleFilterPanel
}
The names of the actions used for actionButton and filterButtons refer to pre-defined "actions". For a full list of actions click here. Actions can optionally take arguments in order to control their behavior. Let's add an argument to addDataItem where we specify the defaults for a new note. We'll also change the icon from the default + sign to one that is specific for adding a new note.
actionButton:
    addDataItem {
        icon: "text.badge.plus"

        arguments {
            template {
                type: Note
                title: "Untitled Note"
            }
        }
    }
Note that all arguments are named. In this case the argument name template is used to define the properties of the default note. The type property points to the type of the element that is added. You can check out the schema explorer for a full list of all supported types and properties. We are actively growing this list and will accept all quality contributions.
The CVU language is very forgiving. It it is compatible with JSON, however as a user you can leave out quotes, commas, brackets ([ and ]), and even colons (:) when defining objects. Newlines, commas, or semi-colons (;) can be used to separate statements from each other.
Rendering instructions
We can define how to render our data, in this case our notes, in various renderers. Let's start with a definition for the list renderer.
Note[] {
    /* Sets the list as the default renderer when notes are viewed */
    defaultRenderer: list

    [renderer = list] {

    }
}
By putting the list renderer selector [renderer = list] inside the definition for a list of notes we are telling the Memri browser how to render notes in a list. Inside the renderer definition we can add properties to control the list renderer as well as a description of how to render a single note in the list. We do this by using a set of predefined UI elements (you can find a full list here)
[renderer = list] {
    slideRightActions: schedule

    VStack {
        alignment: left
        padding: 12 20 0 20

        Text {
            text: "{.title}"
            font: 18 semibold
            color: #333
            padding: 0 0 3 0
        }
        Text {
            text: "{.content}"
            removeWhiteSpace: true
            maxChar: 100
            color: #555
            font: 14 regular
        }
        Text {
            text: "{.dateModified}"
            font: 11 regular
            color: #888
            padding: 8 0 12 0
        }
        Divider
    }
}
The slideRightActions property of the list is set to the schedule action which will enable the user to schedule a reminder (or task) for the note. You can specify one or more actions that are rendered as buttons when the user slides right.
The first UI element is a VStack which renders its children (three Text elements and one Divider element) vertically stacked. Its content is aligned to the left and it has some padding. Similar to CSS, in CVU padding, margin and similar properties are specified by a number in the clockwise order of the top, right, bottom and left edges.
The Text elements render text content as specified in the text property. You may notice that these text properties have quotes around them (i.e. they are "Strings") with curly braces ({ }) in them. These curly braces tell the Memri browser to execute whatever is inside them as an expression. In this case it is a very simple expression that fetches a property (for instance the title property) from the current data item (e.g. Note) that is being displayed. See this wiki article for an overview of the CVU expression language.
And with that we have a working view of our notes in the Memri browser!
The filter panel

The filter panel can be toggled using the filter button and is usually placed in the right bottom corner of the search bar. The screenshot shows both the toggle button and the filter panel.
The filter panel gives the user control over:
- Choosing which renderer to display the content in
- Setting any renderer specific settings
- Sorting property
- The query used to generate the view (Not yet implemented)
Add a filter button to your CVU definition
The filter panel can be toggled using the toggleFilterPanel action that displays as a button. It is usually placed in the right bottom corner of the search bar by adding it to the filterButtons in the CVU definition.
Note[] {
    /* The set of buttons displayed in the search area */
    filterButtons: showStarred toggleFilterPanel
}
Configure sort fields
A user can filter on all fields of a data item, using the filter panel. The sortFields property of a view determines which fields are shown in the top of the list and in which order they appear.
Note[] {
    /* These are the fields that the user can sort on */
    sortFields: title dateModified dateAccessed dateCreated
}
Switching between renderers
A user can easily switch between various renderers to display their content using the filter panel. For instance they can switch to rendering the notes in a grid as thumbnails, or show them on a map based on where the notes were written.


CVU for the thumbnail grid
Similar to the list renderer, the thumbnail renderer for notes in the above screenshot is rendered using the following CVU code:
[renderer = thumbnail] {
    VStack {
        minWidth: 10
        padding: 0 0 5 0
        alignment: center

        Text {
            text: "{.content}"
            maxChar: 100
            color: #333
            background: #fff
            border: #efefef 2
            cornerRadius: 10
            padding: 10
            font: 9 regular
            minHeight: 80
            align: lefttop
        }
        Text {
            text: "{.title}"
            padding: 5 0 0 0
            color: #333
            font: 12 semibold
            maxChar: 100
        }
        Text {
            text: "{.dateModified}"
            font: 9 regular
            color: #888
            padding: 3 0 0 0
        }
    }
}
Check out the new Memri forum where all Memri engineers are active to answer questions and participate in discussions. You can find all the Memri source code on the Memri gitlab. You can find the Note.cvu file, as discussed in this article here. Continue to learn about the developer tools or pick a topic you want to dive in from the list below.